Turning Nature into Colorful Infrared Landscapes

Don’t be too hard on yourself when starting something new. Easier said than done, I know. You start a new project yet your results don’t look like everyone else’s. You get frustrated. That’s what happened when I started photographing infrared landscapes. We are not going to be good at something from the start. I had to learn to be patient and just keep trying.
After about a month and a half of frustration, my infrared landscapes are finally looking the way I envisioned. I honestly thought about giving up a few times. My photos weren’t turning out like the ones I saw online and I couldn’t figure out why. I talked about that frustration in the post Getting into Otherworldly Infrared Landscape Photography.
My first photo looked like this:

Pretty colors but out-of focus.
When I got the scene in focus, it looked like this:

I have to keep telling myself this isn’t a bad photo. It’s really not. But, it isn’t what I want.
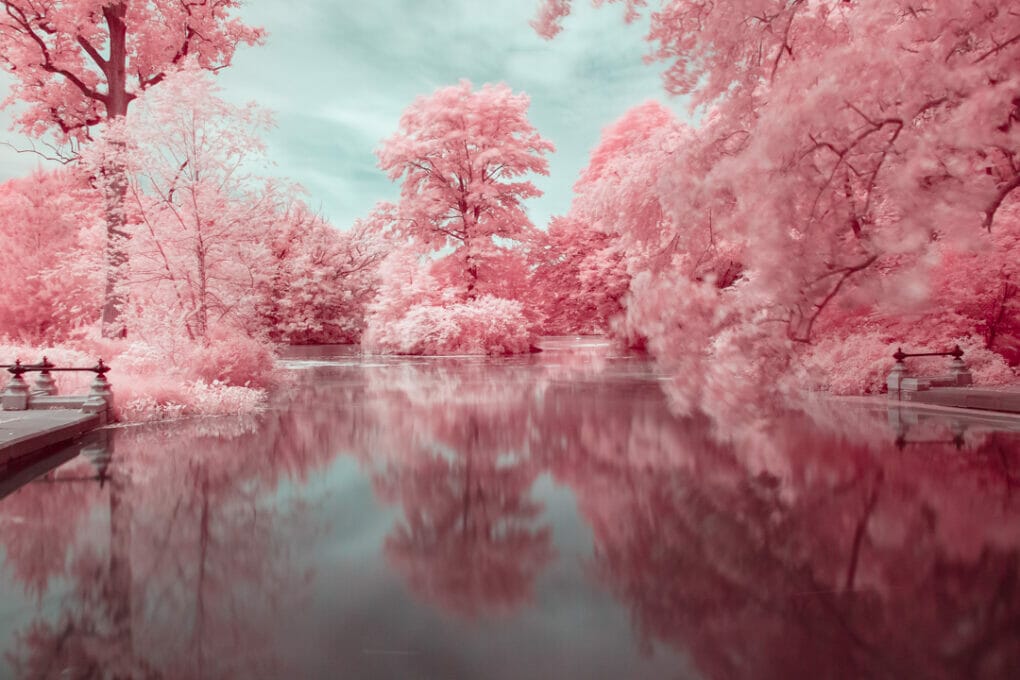
This is:

It’s taken a little over 700 photos to reach this point.
If you follow me on Instagram, you may already know some things about this journey. I started infrared landscape photography with the screw-on Neewer IR filter.

I tried this filter for weeks and I wasn’t getting the photos I wanted. Maybe it only works with certain cameras. The case came with four different filters. I may experiment with them more. So far, I haven’t found any photographers talking about issues with these filters.
Recently, I decided to spend $65 on a Hoya R-72 IR filter. Almost, every infrared photographer I’ve watched use this filter. It isn’t expensive compared to most camera equipment. But, when you’re living paycheck-to-paycheck, spending more than $50 on anything is a lot. Didn’t expect it to come in such a fancy case, though.

The Hoya filter didn’t work for me right away. It’s darker than the Neewer filter. I experimented a bit with my camera settings and now I’m getting somewhere.

A few things I’ve learned
- Buy the Hoya filter and save yourself the frustration.
- Be patient and go easy on yourself. Infrared photography is not easy.
- Not for beginners. If you’re just starting out in photography, I’d suggest holding off on infrared landscapes until you’re comfortable with camera settings, composition, exposure and post-processing.
- The magic is in the editing. I use a combination of Adobe Lightroom and Photoshop.
- Study other infrared photos to get editing ideas.
- Go full Manual Mode. I usually use Aperture and Shutter Priority mode. But neither worked for me. I now have to use Manual Mode for infrared photos.
- Beware windy days. To get a properly exposed infrared shot, you need a slow shutter speed. I set mine for 30 seconds. Nature needs to be still, which rarely happens. Beecause of the wind, most of my photos are partially blurry.
- Cover your viewfinder when shooting. With infrared photography, you’re more likely to see hotspots when editing. You can see mine in the below shot. That pink spot right in the middle of the tree. Ideally, you’d buy a better lens. But, I can’t. One Youtuber suggested covering your viewfinder with something (not your hand). That seems to have done the trick.
I love infrared photography. Each edit gets me so excited. I’m turning my photos into fantasy landscapes. I have a lot to learn. For that white tree, I don’t know exactly how I did that. So far, I’ve only been able to get pale blue trees. I’m still happy with how my photos are turning out.
If you want to create infrared landscapes
Here are a few things that helped me. I found videos easier to follow than blog posts. I also collected some photos for inspiration.
Infrared Photography YouTube Playlist
Inspiration: Pinterest and Behance
20 Stunning Infrared Photographs
A Guide to Infrared Photography
Beginner’s Guide to Infrared Photography
How to do Surreal Digital Infrared Photography Without Expensive Gear or Camera Conversions
How to Do Infrared Photography With Basic Camera Gear
Infrared Prints Now Available

I wasn’t sure if I could start adding infrared photos to my shop. But, a few of my recent shots passed my 100% test. I don’t put up photos if they fall apart when zoomed in to 100%.
Join me on Instagram to follow my infrared landscape photography journey.


Auden, your posts are always so fun and informative. The treasures of helpful information are so appreciated.
I’ll be sure to share your prints for others to enjoy, too.
Thanks always.
I am so impressed … you never give up and keep turning over new ways on a shoestring budget. Can’t wait to see what you come up with next. All the best with infrared!
I always find your blogs so informative. I never knew about infrared photography, but what cool photos!
All the possibilities are amazing.
WOW Auden, these are amazing and great advice too for the avid photographer. Just stunnning!